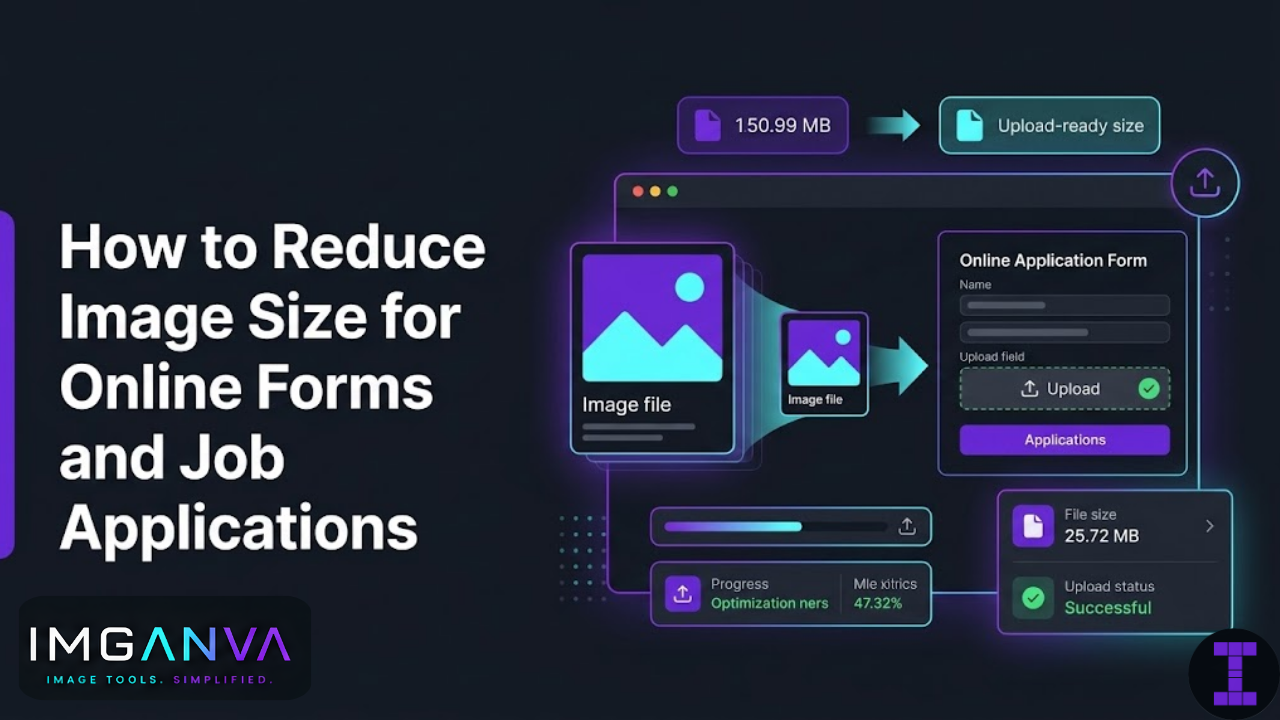
If your photo or document scan is larger than the limit, the form rejects it. The error message usually just says “file size too large” without telling you exactly what to do about it. This guide walks through how to bring image files down to whatever size a form requires.
Common Upload Size Limits You’ll Run Into
Different systems set different limits. Here’s a rough picture of what to expect:
| Platform / Use Case | Typical File Size Limit | Common Formats Accepted |
|---|---|---|
| Government exam portals (UPSC, SSC, etc.) | 20KB – 100KB | JPG |
| University admission portals | 50KB – 500KB | JPG, PNG |
| Job application sites (Naukri, LinkedIn, etc.) | 2MB – 5MB | JPG, PNG, PDF |
| Bank and financial institution forms | 100KB – 1MB | JPG, PNG |
| Visa and passport applications | 200KB – 1MB | JPG |
| Insurance portals | 500KB – 2MB | JPG, PNG, PDF |
| Company HR portals | 1MB – 5MB | JPG, PNG, PDF |
Government exam portals in India are often the strictest photo and signature uploads of just 20–50KB are common for UPSC, SSC, NTA, state PSC exams, and railway recruitment boards. These require more aggressive compression.
Format Choices That Affect File Size
Before compressing, the format itself matters. Choosing the right format can reduce size significantly before you touch any quality settings:
JPG for photos and passport-size images
JPG is the right choice for photographs, ID photos, and passport-size pictures. It uses lossy compression designed for photographic content and produces small files. Most government forms specifically require JPG. A decent-quality JPG of a passport-size photo can be kept well under 50KB without looking degraded.
PNG for documents and screenshots
PNG works better for scanned documents, signatures, and anything with text because it preserves sharp edges. However, PNG files are generally larger than JPG for the same image. If a form accepts JPG, converting a PNG document scan to JPG will usually reduce size significantly.
WEBP for flexible uploads
If a form accepts WEBP (less common but increasingly supported), WEBP can give you the smallest file size. For most official forms, though, you’re expected to submit JPG or PNG.
How to Reduce Image Size Step by Step
Step 1: Check the form requirements carefully
Before doing anything, read the upload guidelines. Look for: file size limit, dimensions (height × width in pixels), accepted formats, and any specific instructions about photo backgrounds or framing. Compressing to the wrong format or wrong dimensions wastes time.
Step 2: Compress the image
Go to Imganva’s Image Compressor, upload your file, and adjust the quality/compression level. The tool shows you the output file size so you can check whether you’ve hit the target before downloading.
For most photos, reducing quality to 70–80% is barely noticeable visually but can halve the file size. For very strict limits like 20KB, you may need to go lower around 50–60% while keeping dimensions small.
Step 3: Resize dimensions if needed
File size depends on both compression and dimensions. A 1200×1800 pixel photo at 70% quality might still be 200KB. Resizing it to 200×300 pixels (a typical passport size) and then compressing will get you to 20–40KB easily.
You can resize images using Imganva’s Image Resizer before or after compression. Check the form requirements for pixel dimensions many government portals specify exact width and height.
Step 4: Convert format if required
If the form requires JPG and your file is PNG, convert it first. JPG will almost always produce a smaller file for photographic content. Use a converter to switch format without losing more quality than necessary.
Step 5: Verify the final file
Before uploading, check your final file size. On Windows, right-click the file → Properties → file size. On Mac, it shows in the Info panel (Cmd+I). Make sure it’s below the limit with some margin if the limit is 100KB, aim for 90KB or less to avoid edge cases.
Hitting Very Strict Size Limits (Under 50KB)
Some portals particularly for competitive exam registrations require photos under 50KB or even 20KB. This requires a combination of small dimensions and higher compression. Here’s what works:
| Target Size | Recommended Dimensions | Recommended Quality | Format |
|---|---|---|---|
| Under 20KB | 150×200 px or smaller | 50–60% | JPG |
| 20–50KB | 200×250 px to 300×400 px | 60–70% | JPG |
| 50–100KB | 300×400 px to 400×600 px | 70–80% | JPG |
| 100–500KB | Standard camera dimensions fine | 75–85% | JPG or PNG |
For signatures, aim for dimensions around 100×50 pixels at 50–60% JPG quality. Signatures typically compress to well under 10KB at those settings.
Photo Requirements for Job Applications
Job application photo requirements are usually more relaxed than exam portals, but there are still practical things to keep in mind:
- Professional photo: Use a photo with a plain background (white or light grey is standard). Cropped headshots upload cleaner than full-body photos.
- File size: Most job portals accept up to 2–5MB, so extreme compression isn’t needed. A high-quality JPG around 200–500KB looks good and uploads reliably.
- Dimensions: 400×400 to 600×600 pixels is typically fine for a profile/application photo. Very large images (from phone cameras) should be resized before uploading a 12MP photo is unnecessary for an application thumbnail.
- LinkedIn: recommends 400×400 pixels, under 8MB. But keeping it under 500KB makes for faster loading.
Document Scan Compression Tips
If you’re uploading scanned documents certificates, degrees, ID copies the same principles apply but with a few additional points:
- Scan at 150–200 DPI for web uploads 300 DPI is for print. Scanning at 300 DPI and uploading for a web form gives unnecessarily large files. 150–200 DPI is enough for digital reading.
- Greyscale or black-and-white for text documents Most certificates and documents don’t need color. Switching to greyscale before compressing significantly reduces file size.
- Crop to the document edges Remove the scanner border or desk background. Less image area means smaller file.
- JPG works for most scanned documents Even though PNG handles text edges better, the file size difference is large enough that JPG at 80% quality is usually acceptable for official document uploads.
Why Images Get Rejected Even When You Think They’re Small Enough
A few things that trip people up:
- Checking KB vs MB: 500KB is 0.5MB. Forms that list limits in KB are almost always stricter than they first appear when you’re used to thinking in MB.
- The form rounds up: A file showing as “99.8KB” in your file manager might show as 100.1KB to the form’s backend. Keep a small margin below the limit.
- Wrong format accepted: Some forms only accept JPG and reject PNG even if it’s smaller. Always match the format to what’s listed in requirements.
- EXIF data: Photos taken on phones carry EXIF metadata (GPS coordinates, camera model, etc.). This adds file size. Some compressors strip EXIF automatically, which helps reduce size.
Frequently Asked Questions
- How do I reduce image size for government exam portals?
- Resize the photo to the required pixel dimensions first, then compress the JPG to 60–70% quality. This gets most passport photos under 50KB. Use Imganva’s compressor and resizer for both steps.
- What is the best format for uploading photos to online forms?
- JPG works for most forms it produces smaller files than PNG for photographs and is nearly universally accepted. Check the form’s stated format requirements before converting.
- How do I get an image under 100KB?
- Compress to 70–80% quality and reduce pixel dimensions if the image is large. A passport photo at 300×400 pixels compressed to 75% is typically under 100KB.
- Can I reduce image size without losing quality?
- At 75–85% quality, the difference is usually invisible. Lossless compression reduces size without any quality loss but gives smaller savings than lossy compression.
- Why is my photo still too large after compressing?
- The pixel dimensions are likely too large. File size depends on both compression and dimensions. Resize the image to smaller dimensions and then compress again.
- What size should a passport photo be for online applications?
- Requirements vary. Common specifications are 200×250 or 300×400 pixels in JPG, under 50KB or 100KB. Always read the specific upload instructions on the form.
Quick Reference: Common Exam Portal Photo Requirements
| Exam / Portal | Photo Size | Signature Size | Format |
|---|---|---|---|
| UPSC CSE | 20KB – 300KB | 20KB – 300KB | JPG |
| SSC exams | 20KB – 50KB | 10KB – 20KB | JPG |
| NTA (JEE/NEET) | 10KB – 200KB | 4KB – 30KB | JPG |
| RRB (Railway) | 15KB – 40KB | 10KB – 20KB | JPG |
| IBPS / Bank exams | 20KB – 50KB | 10KB – 20KB | JPG |
Note: These requirements change periodically. Always verify against the current official notification for the exam you’re applying to.
The Main Points
Getting images under a file size limit is mostly a matter of two things: resizing to appropriate pixel dimensions and compressing at the right quality level. For most forms, a combination of reducing dimensions and compressing to 70–80% JPG quality is enough. For very strict government exam limits under 50KB, you need both small dimensions and higher compression.
The Imganva compressor lets you see the output file size before downloading, which makes it easier to hit the exact target without guesswork.